
In case you don't know what that is, it's a moving picture, like this;

What you will need;
Okay! Let's get started.
Step 1. If this is your first time using VLC, you'll need to do this before you can actually start making the GIF;
Go to Tools > Preferences
Click on Video (red circle) and then take a look at the saving options box (black circle)
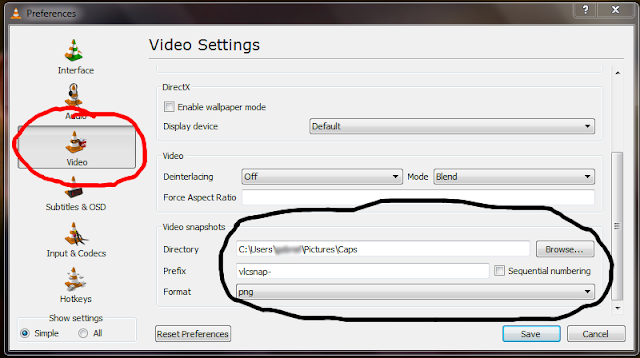 Directory: This tells the program where to put the screencaps (not sure what those are? You'll find out in a minute) once they've been taken. I made a special folder in my pictures file. You can create one just for the screencaps (reccommended) or just have them put into whatever folder you already have created. Click on the browse button, and then select a folder.
Prefix: All this is is the name of the screencap. You can change this to whatever you choose.
Format: The format of the screencap. Make sure it's on png.
Step 2: Open your video file in VLC. Either pop a disc into your computer, or go to open up your downloaded video. Not sure where it saved? Try going into your Videos folder.
Go to the clip you want to make into a GIF. As it approaches, hold down the Shift and S key. KEEP HOLDING IT DOWN - DO NOT RELEASE AT ANY TIME until the clip has passed. As you're doing this, you'll see the screencaps being saved.
Step 3: Root through the file that you saved the screencaps in. Delete excess ones, (ones too early, ones too late. Also, I suggest you make sure there's no more than 25, unless absolutely necessary. So they're easier to load.) and for convenience's sake, I reccommend renaming them, so they're easier to keep track of.
Step 4: Edit them. Open up GIMP. Go to File > Open and click on your first screencap. Once the image is open, you need to make it smaller, so go to Image > Scale Image and type in 500 (or less, but never go any higher than 500) on the top pixel box. Leave the bottom one alone.

Click Scale. Once it's shrunk, you can do whatever else you want to. Change the saturation, the brightness/contrast, even add text if you like. You'll need to repeat this on every one of your screencaps, so remember to do exactly the same editing on each one, otherwise the GIF will look choppy and strange.
*Note; You don't HAVE to use GIMP. You can use whatever photo editing program you're comfortable using. This is just how I do it, if you'd rather edit them some other way, go right ahead.
For the record, here's what I'm going to do with mine;
I'm going to enhance the saturation (it makes all the colors brighter and more vivid.) by clicking on Colors > Hue-Saturation.
I'm going to drag this little bar...

All the way to the right. See the difference?
 Now you're going to want to pay attention to the little box in the black circle. If you don't decide to drag it all the way one way or the other, you'll need to pay attention to the number in the box, so that you can make sure it's the exact same for every other screencap you edit.
Now, I'm going to fiddle with the brightness and contrast a bit. I'm going to go into Colors > Brightness-Contrast and drag each bar up to about...eh, 31. That's what I usually do. Again, note the black circles.
 It makes it more, I don't know, dramatic. It looks nice on GIFs, I think, because it makes them stand out. Now I'm not going to add any text on this one, so if you want to know how to do that, send me an e-mail and I'll explain.
So that's all I'm going to do. I will save this, and then I'm going to repeat these steps on allllll the other screencaps (actually I only have thirteen in all, that's pretty good) and then we'll get down to the next step.
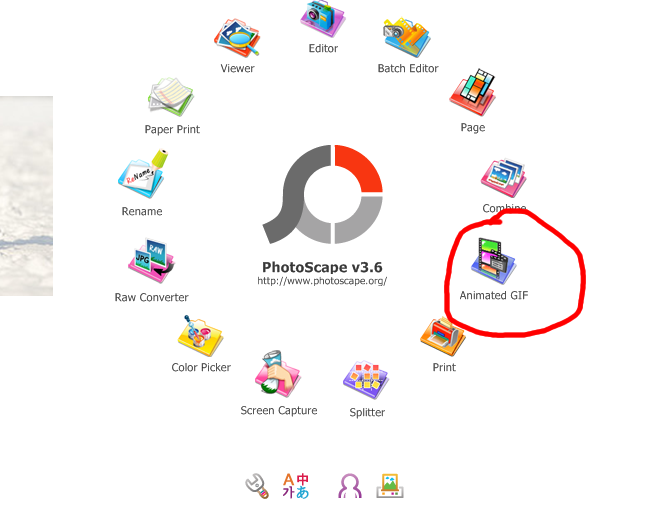
Step 5: Open up Photoscape, and click on Animated Gif


Now, below, all the photos in that folder will appear. Click on the first one, hold down on the Shift key, and then click the last one, so you can select them all at one time (this is just easier).

Now drag them all into the big grey empty space, and watch it animate! You may want to fiddle with the settings, mainly the timing (so it moves just right) so go to the right, and click on Change Time.

Don't vary it between 9 and 15. Otherwise it's either too slow or too fast, unless of course, you want it to be. At the top, you can see a row with all your caps. If you want to shorten the GIF, or make several scenes, you can add more caps, or delete some caps. Whatever you like. Once you've gotten a GIF that you're satisfied with, click save, and you're done!
I tried to make this as simple as possible (hard to believe, eh?), but if you have any questions at all, either send me an email or drop a comment below!
Have fun, and don't be afraid to experiment!

- VLC Media Player
- RealPlayer Download
- Photoscape
- GIMP or whatever photo editing program you prefer
All of these are free and you can download them straight off the internet. They're completely safe and trustworthy, I promise.
Now, there are two ways to make GIFs. You can make them from a DVD, or from a video you downloaded off the internet, which is what RealPlayer is for. Once downloaded, it makes a little popup appear at almost every video you'll view, with the option to download it.
If you'd rather just use DVDs, skip RealPlayer altogether, but I highly reccommend getting it.
______________________________________________________________________________________Okay! Let's get started.
Step 1. If this is your first time using VLC, you'll need to do this before you can actually start making the GIF;
Go to Tools > Preferences
Click on Video (red circle) and then take a look at the saving options box (black circle)

Prefix: All this is is the name of the screencap. You can change this to whatever you choose.
Format: The format of the screencap. Make sure it's on png.
Step 2: Open your video file in VLC. Either pop a disc into your computer, or go to open up your downloaded video. Not sure where it saved? Try going into your Videos folder.
Go to the clip you want to make into a GIF. As it approaches, hold down the Shift and S key. KEEP HOLDING IT DOWN - DO NOT RELEASE AT ANY TIME until the clip has passed. As you're doing this, you'll see the screencaps being saved.
 |
| the text fades fast, so I couldn't capture that part in time. |
Step 3: Root through the file that you saved the screencaps in. Delete excess ones, (ones too early, ones too late. Also, I suggest you make sure there's no more than 25, unless absolutely necessary. So they're easier to load.) and for convenience's sake, I reccommend renaming them, so they're easier to keep track of.
Step 4: Edit them. Open up GIMP. Go to File > Open and click on your first screencap. Once the image is open, you need to make it smaller, so go to Image > Scale Image and type in 500 (or less, but never go any higher than 500) on the top pixel box. Leave the bottom one alone.

Click Scale. Once it's shrunk, you can do whatever else you want to. Change the saturation, the brightness/contrast, even add text if you like. You'll need to repeat this on every one of your screencaps, so remember to do exactly the same editing on each one, otherwise the GIF will look choppy and strange.
*Note; You don't HAVE to use GIMP. You can use whatever photo editing program you're comfortable using. This is just how I do it, if you'd rather edit them some other way, go right ahead.
For the record, here's what I'm going to do with mine;
I'm going to enhance the saturation (it makes all the colors brighter and more vivid.) by clicking on Colors > Hue-Saturation.
I'm going to drag this little bar...

All the way to the right. See the difference?

Now, I'm going to fiddle with the brightness and contrast a bit. I'm going to go into Colors > Brightness-Contrast and drag each bar up to about...eh, 31. That's what I usually do. Again, note the black circles.

So that's all I'm going to do. I will save this, and then I'm going to repeat these steps on allllll the other screencaps (actually I only have thirteen in all, that's pretty good) and then we'll get down to the next step.
Step 5: Open up Photoscape, and click on Animated Gif
Choose the folder you want to use from the menu to the left. In my case, it's my Caps file.
Now drag them all into the big grey empty space, and watch it animate! You may want to fiddle with the settings, mainly the timing (so it moves just right) so go to the right, and click on Change Time.

Don't vary it between 9 and 15. Otherwise it's either too slow or too fast, unless of course, you want it to be. At the top, you can see a row with all your caps. If you want to shorten the GIF, or make several scenes, you can add more caps, or delete some caps. Whatever you like. Once you've gotten a GIF that you're satisfied with, click save, and you're done!
 |
| Isn't he lovely? |
I tried to make this as simple as possible (hard to believe, eh?), but if you have any questions at all, either send me an email or drop a comment below!
Have fun, and don't be afraid to experiment!
3 comments
Thanks!!! I'll have to try it!
ReplyDeleteThanks maybe I will get around to trying this some day! It looks like a lot of fun!
ReplyDeleteI must say that I am very fond of the last one with Mr. Thornton! :) He is very lovely!
This is pretty cool(:
ReplyDeleteI've always been quite curious on how to create these..
Thank you for sharing!!
xxo. Jazzie
www.jsheaa.blogspot.com
Be kind. I ♥ comments.